Balcony power plant
We already use very little electricity, our annual requirement is around 1500 kWh, but I wanted to play around with photovoltaics and also generate my own electricity.
As we want to replace our old gas heating system with a heat pump, we will soon be installing a large PV system on our roof.
Hardware
As it was the first step and therefore also a test, I opted for a very simple and inexpensive complete set. It was also really cheap, I only paid € 379 for the set. It is still temporarily on the patio, but it will go on the roof of the garden shed once we have repaired the roof. The set consists of:
- 2 Module a 375 Wp
- ein Deye SUN800-G3-EU inverter
- a simple attachment for the ground
As the data logger that comes with the inverter doesn’t provide enough data, I added a Shelly 3 Mini PM to the supply line to measure the PV power.
Installing the power plant
Setting up a set is quite simple. All the individual parts have plugs that make it almost impossible to mix them up and there are lots of videos on the internet with instructions.
I found it more difficult to assemble the bracket. As I didn’t want to screw the bracket firmly to the terrace, I had to use 120 kg to weigh it down so that the module wouldn’t fly away in a storm.
A little tip, ask your personal liability insurance, mine would cover any damage if my modules were to fly off. 🙂
the solarman Integration
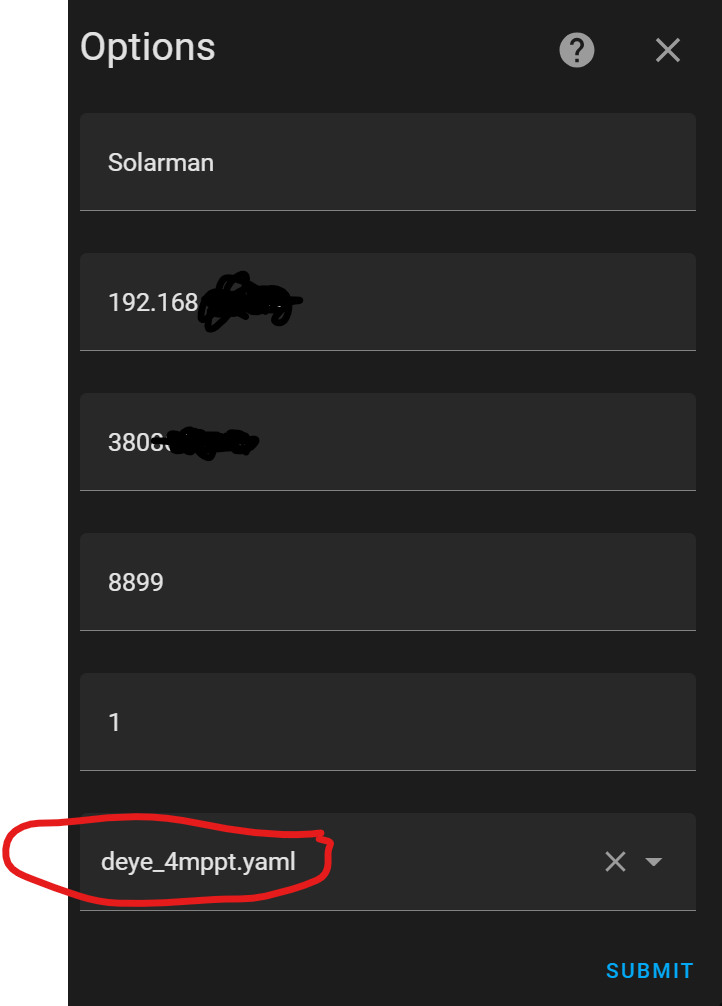
The interaction for Home Assistant is available via the HACS.
You have to play around a bit with the templates when setting it up. In my case, the Deye 800 inverter with 2 modules was only recognized by the older Solarman version 1.4.3 and only if I selected the template for a Deye inverter with 4 modules 🙁 .
There are many instructions on the net about the problem.
Just enter the IP address of the data logger, the serial number and then the values are available in Home Assistant..
The integration offers a lot of entities, I was “only” interested in the values for the generated PV power.
In the end, I only use the status, the total kWh generated and the power currently being generated via the Shelly.
setting up the energy dashboard
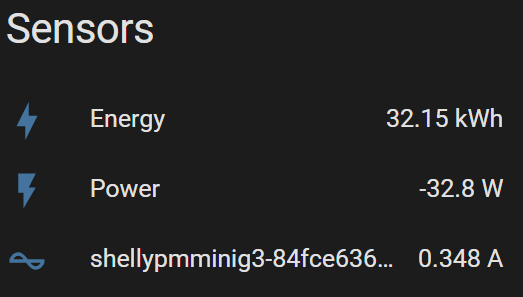
I have installed a Shelly to measure the PV power generated, which now delivers a negative value.
Therefore I built a helper that multiplies the value by -1.
I then use the helper for my own dashboard and the Shelly for the Home Assistant energy dashboard.
{{states.sensor.shellypmminig3_84fce636d384_power.state |float() * -1 }}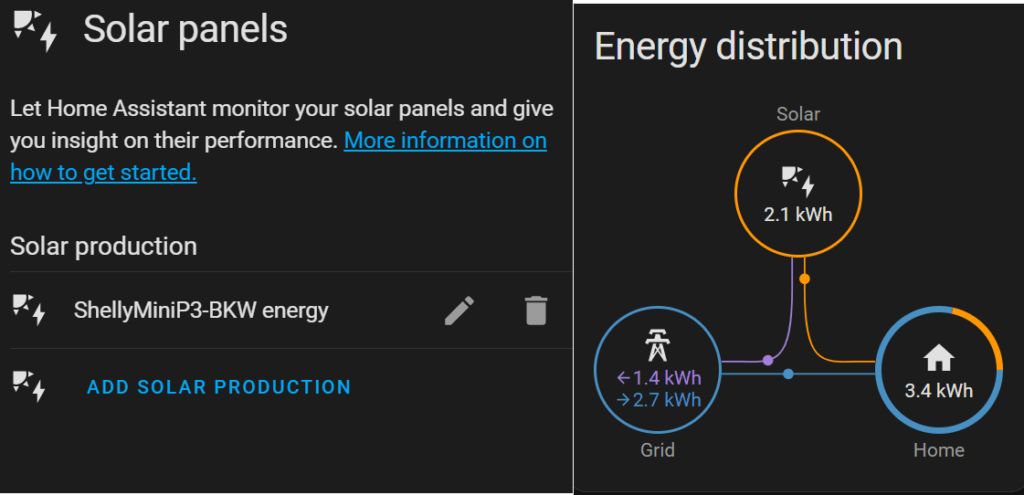
my own dashboard
My own dashboard has an Energy subpage where I display the consumption values of the Shelly 3EM and now also the values of the PV system.
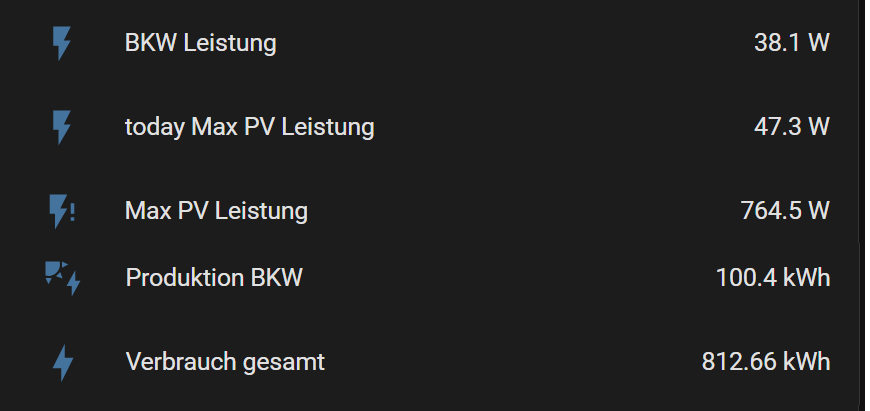
I have the following values in the dashboard:
- PV power currently being generated
- Daily maximum power of the PV
- Maximum power of the PV
- Total production
- and of course the values of the Shelly 3EM with the consumption
The two values for maximum power are realized via two helpers, the other values come directly from the integrations.
daily max Power
I determine the value with a triggered TemplateSensor, you can find the help page here. The code must be added to configuration.yaml. The sensor returns the highest determined value of the “sensor.bkwshelly” and the value is reset every night at 0:00.
template:

  - trigger:
      - platform: time
        at: "00:00:00"
      - platform: state
        entity_id: sensor.bkwshelly
    sensor:
      - name: "todays max PV"
        unique_id: today_max_pv
        unit_of_measurement: "W"
        device_class: power
        availability: "{{ states('sensor.bkwshelly') | is_number}}"
        state: >
          {% set t_new = states('sensor.bkwshelly') | float(-99) %}
          {{ [t_new, this.state | float(-99)] | max if trigger.platform != 'time' else t_new }}
        attributes:
          power_updated: "{{ now() | as_local }}"
highest Power value
To determine the highest value of a sensor, there is the statistics sensor. As I have moved my sensors to a separate sensor.yaml, here is the code for it. If you still have your sensors in configuration.yaml, the code must of course be in the “sensor:” section
- platform: statistics
  name: "PV power MAX"
  unique_id: pv_max
  entity_id: sensor.bkwshelly
  state_characteristic: value_max
  max_age:
    days: 1000