I have written an integration for Home Assistant that can read and control a Lambda heat pump.
Use the code, or the whole integration, at your own risk, and it is not an official integration from the manufacturer of the heat pump.
The code can be found here: https://github.com/GuidoJeuken-6512/lambda_heat_pumps
This custom integration allows the integration of Lambda heat pumps into Home Assistant via the Modbus/TCP protocol. It reads sensor data and enables the control of climate entities (e.g. hot water, heating circuit).
If anyone would like to collaborate, please get in touch!
Features
- Readout of various heat pump sensors (temperatures, statuses, energy consumption, etc.).
- Control of the target temperature for hot water and heating circuits via climate entities.
- Dynamic adjustment of the sensors based on the firmware version.
- Configuration via the Home Assistant UI (integration).
- Control of the Lambda with one room thermostat per heating circuit
- Control of the Lambda in the event of a PV surplus
- Exclude certain registers
- Rename certain sensors to keep historical data in the Home Assistant
- Adjusting the interval for reading out the sensors
- Calculated COP sensor based on thermal energy output and power consumption
- Sensors for cycling by operating mode (total / daily / yesterday)
Installation
At the moment there is only a manual installation, I am still working on a direct installation via HACS.
manuell Installation via HACS:
- Install HACS (if not already done)
- Follow the official HACS installation guide
- Add custom repository
- Open HACS in Home Assistant
- Go to Integrations
- Click on the three-dot menu (⋮) → “Custom repositories”
- Paste the repository URL: GuidoJeuken-6512/lambda_wp_hacs
- Select category: “Integration”
- Install the integration
- Search in HACS for “Lambda Heat Pumps”
- Click on ‘Download’ → Confirm with “Download”
- Restart Home Assistant
Manual installation:
- Copying the files:
- Copy the entire “lambda_heat_pumps” folder (with all contained files such as init.py, sensor.py, manifest.json etc.) into your “custom_components” folder within your Home Assistant configuration directory.
- Path: /custom_components/
lambda_heat_pumps/ - if the “/custom_components/” folder does not exist, please create it first.
- The folder can be created and the files copied using the “File editor” addon, for example
- Restart Home Assistant:
- Restart Home Assistant so that the new integration is recognized.
- Configuration
- Add integration:
- In Home Assistant, go to Settings -> Devices & services.
- Click Add integration at the bottom right.
- Search for “Lambda Heat Pumps” and select the integration.
- Search for “Lambda Heat Pumps” and select the integration.
- Add integration:
- In Home Assistant, go to Settings -> Devices & services.
- Click Add integration at the bottom right.
- Search for “Lambda Heat Pumps” and select the integration.
- Enter connection data:
- Name: Any name for your heat pump (e.g. “EU08L”).
- The sensors are given the name as a prefix!
- If the modbus variant was previously used to read out the Lambda, the corresponding name must be entered here. (e.g. EU08L)
- Host: The IP address of your Lambda heat pump in the network (e.g. 192.168.1.100).
- Port: The Modbus/TCP port (default is 502).
- Slave ID: The Modbus slave ID of your heat pump (default is 1).
- Specify the number of different Lambda components.
- Legacy Modbus name: A naming scheme is then used that is the same as the names of the “old” Modbus script. This should preserve the historical data of the Lambda.
- Firmware version (not yet implemented): Select the appropriate firmware version for your heat pump. This influences which sensors are available. You can see the firmware version in the Lambda Remote Console.
- Complete:
- Click on Send. The integration will now be set up and the corresponding entities (sensors, climate) should appear in Home Assistant.
- the translations do not work everywhere
Configuration
Options:
Once set up, you can customize some options via Settings -> Devices & Services -> Lambda Heat Pumps -> Configure:
To be able to use the “Room thermostat control” and “PV surplus” options, certain configurations must be made in Lambda beforehand. See below for more information!

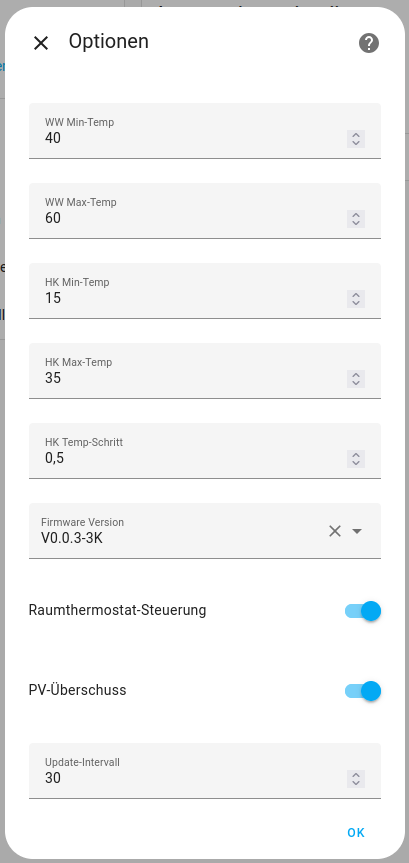
Temperature ranges: Minimum and maximum target temperatures for hot water and heating circuit.
Firmware version: Changing the firmware version (requires a restart of the integration)..
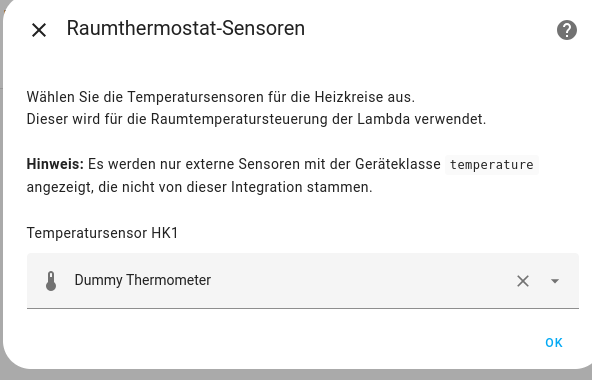
The use of one room thermostat per heating circuit. This control must be enabled in the Lambda. The value of a thermometer can then be written to register 5×04.
One thermometer can be selected per heating circuit in the integration options.
Room thermostat control
If this option is activated, the Lambda adjusts its heating curve using the set delta value.
If the room is warmer than the setpoint temperature, the Lambda reduces the heating curve, otherwise it increases the heating curve.
In the Home Assistant integration, a thermometer is queried for each heating circuit once the option has been activated. The Lambda will then regulate accordingly based on the temperature values of this thermometer.
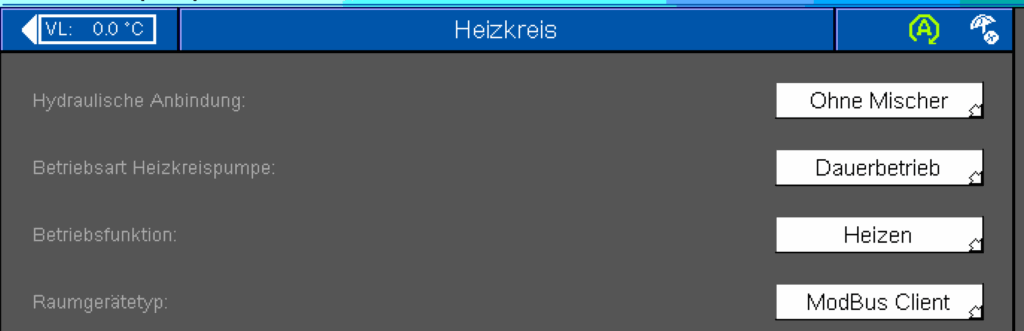
In the Lambda, the room device type must be set to “ModBus Client” for room thermostat control in all heating circuits
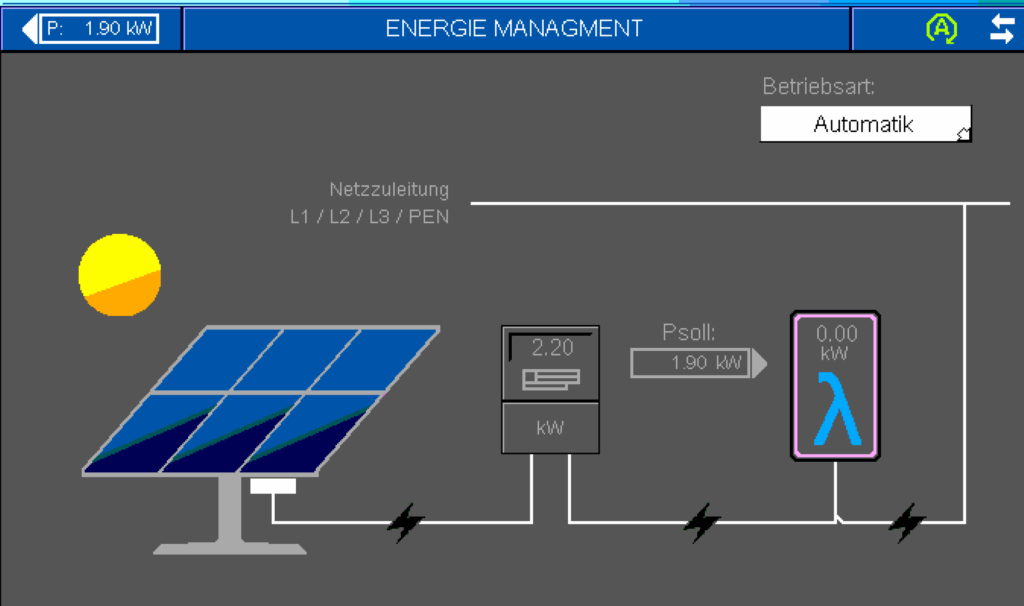
PV surplus
The Lambda can increase its power if there is a PV surplus. To do this, it receives the information via Modbus, register 102 is written with “W” PV surplus.
For this purpose, a sensor of the “Power” class is queried when configuring the option. The value in W, kW is converted and then written to the Lambda via Modbus to register 102. The Lambda then increases its power if there is a large PV surplus.
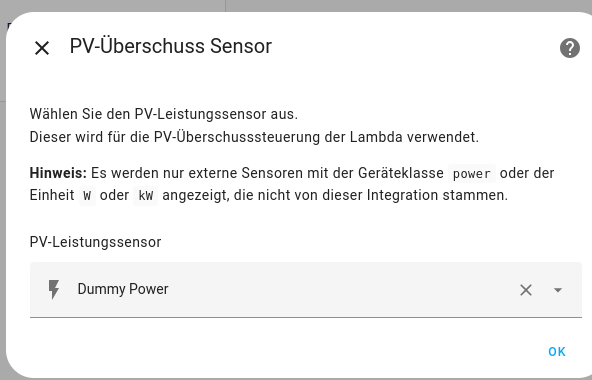
The following settings must first be set in Lambda, the PV surplus is then also visible in the Lambda interface:

Exclude registers
It can happen that certain Lambda heat pumps have a different configuration. In my case, for example, no circulation pump is configured in the heat pump, as I control it directly from Home Assistant.
This results in warnings in the Home Assistant log that certain Lambda registers cannot be read.
These can then be specifically excluded.
To do this, enter the addresses that should not be read out in lambda_wp_conig.yaml in the main directory of Home Assistant.
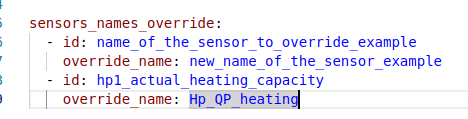
Here is the screenshot of my configuration.

Rename sensor names
To retain historical values in Home Assistant, it may be necessary to keep old names for certain sensors. This can be configured.
To do this, enter the original name and the name to be used in lambda_wp_config.yaml in the main Home Assistant directory and load the new integration.